Lab 5

space pirate queen Emeraldas movie poster, pirate woman in space
Click the image to see a before and after.

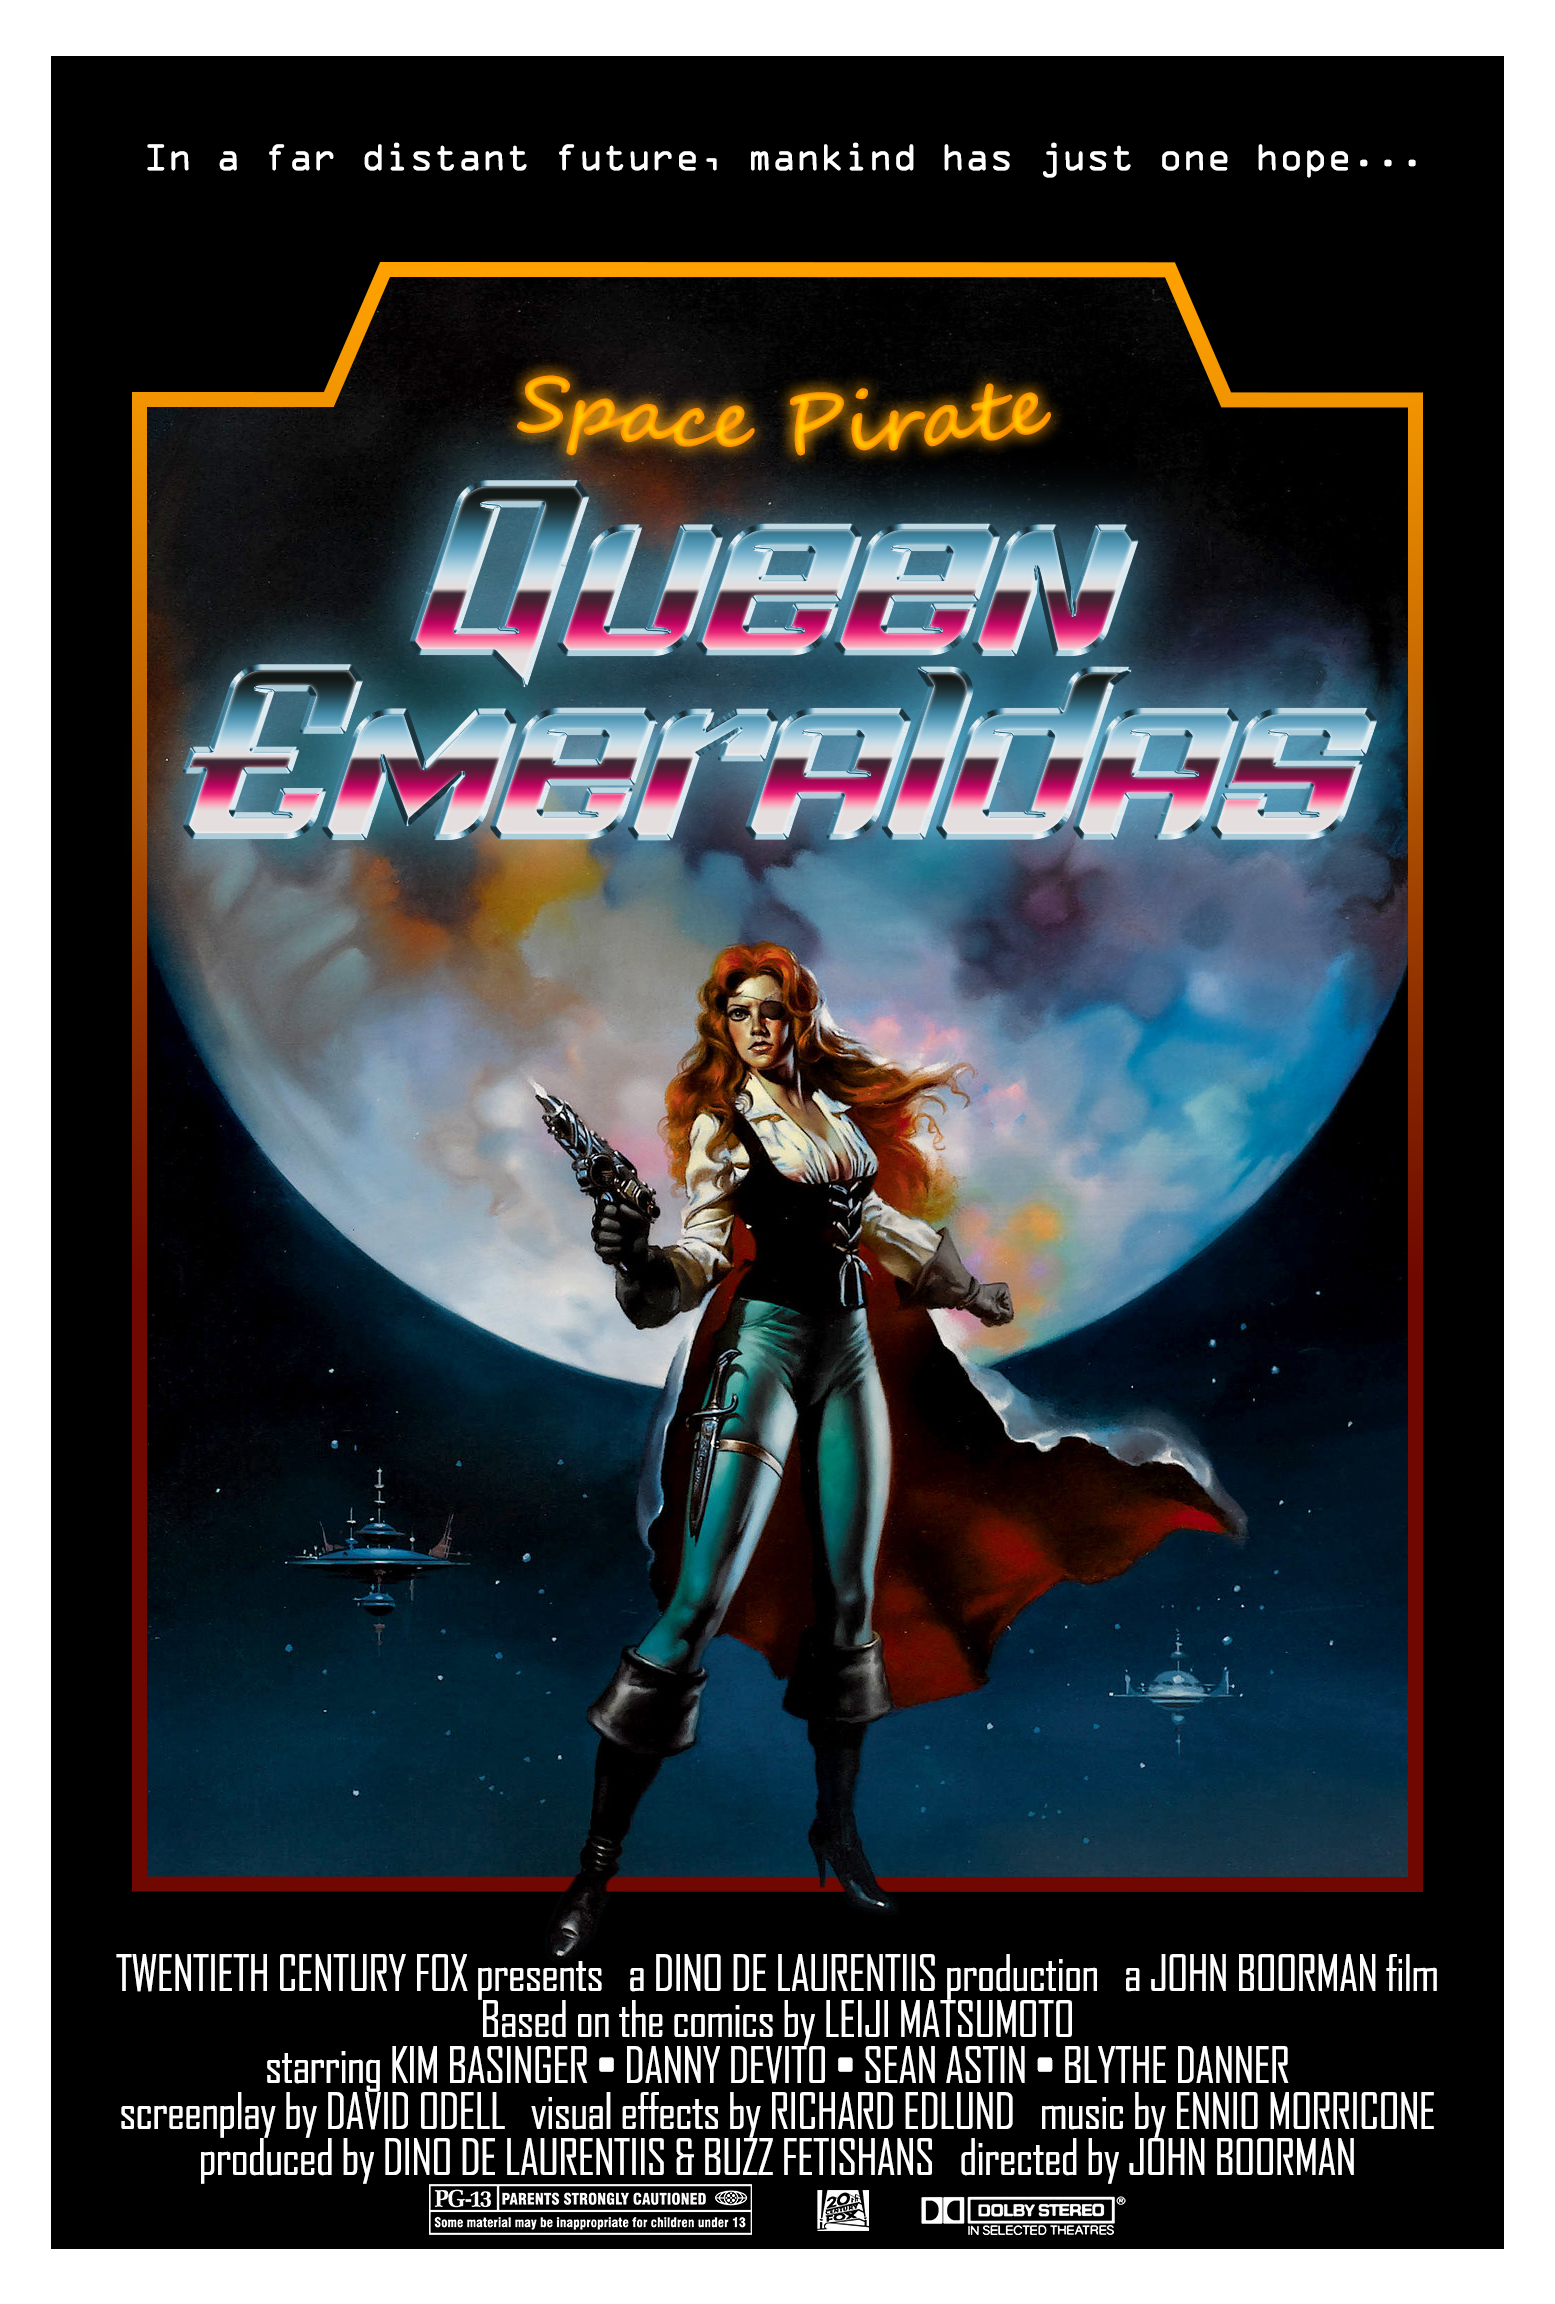
Space Pirate Queen Emeraldas

Movie Poster

The assignment for this lab was to make a poster, with the minimum requirements of one photo, two vector shapes, and two text blocks. The specific requirements were that it needed to be in a standard poster aspect ratio at 72 px/in, one text block with a style, one text block on a curved path, three filters on an object, and one smart filter.
Exact details on how I applied everything is in the Detailed Steps section.

After coming across the space pirate woman painting while searching for images I decided to go with a movie poster, with a standard movie poster aspect ratio of 1.5:1 (40 x 27 in). The painting reminded me of the manga series Queen Emeraldas, with Emeraldas wielding the infamous Cosmo Dragoon gun, so I chose to do a live-action adaptation of the manga, produced in the 1980s to fit with the style of the painting, which was a popular style for movie posters at that time.

I took heavy inspiration from the movie poster for Flash Gordon, following a similar aesthetic with the colors and layout, particularly with the border. I also took inspiration from Conan the Barbarian for the general look.

I chose orange and red for the border as that's the secondary color palette of the painting, with the woman's red hair and cape contrasted against the primary color palette of the blues of outer space behind her. It goes top-to-bottom from orange to red as orange pops more and the viewer's eye is drawn to the orange first, and it mimics the direction of the woman's colors, with brighter orange hair flowing down towards a darker red cape.

I went with an angled protrusion at the top of the border not just to do something similar to Flash Gordon and make the image more visually appealing, but to also add space for the "Space Pirate" text, as well as to mimic the shape common on Sega Genesis game box art. I also needed two vector shapes per the assignment's requirements.

For the font style of "Queen Emeraldas" I chose a font called "Boldness Race" as that was the most similar font I could find to the one used on the English manga covers.

The metallic font style is directly inspired by the original Transformers font, but more broadly inspired by other metallic fonts prevalent in the '80s (such as the Heavy Metal magazine or Metallica's Ride the Lightning). This is where I used most of the styles and filters.

The neon cursive font style doesn't have a direct inspiration, but is another visual cliche of the '80s (such as with Road House). I made it orange to match the border and to draw attention to it first, and placed it on a curved path since it didn't make sense to place a curve on any other text in the composition. The curve also "pushes" downwards, further drawing the viewer's eye top-to-bottom, and matches similarly to the curvature of the planet.

Instead of placing the title at the bottom, like with Flash Gordon and Conan the Barbarian, I placed the title at the top of the poster; to frame it within the planet, not leave excess negative space, and to pull the viewer's eye from the top to the bottom. It also helped the airbrush effect of the metallic and neon text to look more natural.

For the visuals of the credits I just replicated a similar style to the Flash Gordon poster.
For the name choices: I chose 20th Century Fox because they distributed Star Wars and Conan the Barbarian; Dino De Laurentiis because he produced Flash Gordon and Conan the Barbarian, as well as Barbarella; John Boorman because he directed Zardoz; David Odell because he wrote Masters of the Universe and Supergirl; Richard Edlund because he did the effects for Star Wars and Masters of the Universe; and Buzz Fetishans because he co-produced Conan the Barbarian with Dino De Laurentiis. Ennio Morricone is most well known for composing spaghetti western scores like The Good, the Bad, and the Ugly, but I chose him because he also did the score for Red Sonja. I chose Kim Basinger for the role of Emeraldas solely because that's who the woman in the painting looks like to me, and she was popular in the '80s. I chose Danny DeVito because there was objectively no other choice for the role of Emeraldas' stocky husband Tochiro. I chose Sean Astin for the role of the young stowaway Hiroshi because he was an iconic child actor of the '80s, starring in The Goonies. And I chose Blythe Danner for the role of the immortal Queen Promethium of the Machine Empire, because she was the lead in Futureworld.

Detailed Steps
  1. Open the original image file.
  2. In the bottom right Layers area, click the lock icon to the right of the "Background" woman thumbnail to unlock the layer.
  3. In the top bar: Image > Canvas Size
  4. Change units to inches. Change Width to 21.6 in and Height to 32 in (1555 x 2304 px).
  5. Click the new layer icon on the bottom right.
  6. In the top bar: Edit > Fill
  7. Change Contents to Background Color (white), and click OK.
  8. In the bottom right Layers area, click and drag the white layer below the woman layer.
  9. Press U for the Rectangle Tool and draw a rectangle in the canvas (1452 x 2192 px), keeping with the aspect ratio of the canvas (white layer).
  10. Press U for the Rectangle Tool and draw another rectangle in the canvas; vertically about 400 px from the top of the canvas to the heel of the woman's right foot, horizontally at the edges of the woman image.
  11. In the left toolbar right click the Object Rectangle Tool and select the Polygon Tool.
  12. In the top toolbar next to the hexagon # icon, set the number of sides to 5.
  13. In the top toolbar click the square icon (Path Operations) and click Combine Shapes.
  14. Draw a pentagon, holding Space to move and Ctrl to rotate, with two opposite points touching both the left and right edges of the smaller rectangle shape, a point touching the woman's corset, and a side about 150 px above the top of the smaller rectangle running parallel to the rectangle.
  15. In the left toolbar click the Foreground Color box.
  16. Change the # value to 700800 and click OK.
  17. In the left toolbar click the Background Color box.
  18. Change the # value to ffa200 and click OK.
  19. In the top toolbar click the Fill box and change it to No Color.
  20. In the top toolbar change the Stroke value to 15 px.
  21. In the top toolbar click the Stroke box and change it to Gradient.
  22. In the Stroke dropdown click Basics and click Foreground to Background (red to orange), then click and drag the red box (Color Stop) underneath the spectrum bar about a third of the way to the right.
  23. In the bottom right Layers area, click the woman layer, then click the layer mask icon on the bottom right.
  24. In the left toolbar right click the Lasso Tool and select the Polygonal Lasso Tool.
  25. Click to draw lines along the interior center of the red/orange border.
  26. Press D to reset the color palette back to black/white.
  27. Press B for the Brush Tool, and paint black on the outside and white on the inside of the red/orange border.
  28. In the bottom right Layers area, click the red/orange border layer, then click the layer mask icon on the bottom right.
  29. While on the layer mask, use the Brush Tool to paint black over the woman's boots so her boots are above the border, adjusting brush properties as necessary.
  30. Press T for the Type Tool and create a text box at the top of the canvas, with the left and right side parallel with the red/orange border.
  31. In the small box, change the font to "OCR A Extended" and size to 40 pt.
  32. In the top toolbar change the Alignment to Center.
  33. Type the tagline.
  34. Press T for the Type Tool and create a text box above the woman's head, with the left and right side parallel with the edge of the white border.
  35. Type Queen, and in the small box change the font to "Boldness Race" and size to 260 pt.
  36. Press T for the Type Tool and create a text box below the Queen text box, with the left and right side parallel with the edge of the white border.
  37. Type Emeraldas, and in the small box change the font to "Boldness Race" and size to 260 pt.
  38. In the bottom right Layers area, right click the Queen text layer, then click Blending Options.
  39. On the left, click Gradient Overlay, then click the gradient spectrum to bring up the Gradient Editor.
  40. Create a total of 6 Color Stops at the bottom of the spectrum:
    1. Box 1: Color #e4dede, Location 15
    2. Box 2: Color #e52677, Location 26
    3. Box 3: Color #3e2634, Location 45
    4. Box 4: Color #e4dede, Location 48
    5. Box 5: Color #4f94b1, Location 70
    6. Box 6: Color #121816, Location 93
  41. Click New to create a custom preset, then click OK.
  42. On the left, click Stroke.
  43. Change the Size to 6 px, Position to Center, Blend Mode to Normal, and Color to #4f94b1.
  44. On the left, click Bevel & Emboss.
  45. In Structure, change the Style to Stroke Emboss, Technique to Chisel Hard, Depth to 150%, and Size to 6 px.
  46. In Shading, click the Gloss Contour box and select "Ring - Double", then check the Anti-aliased box.
  47. On the left, click Contour, and change the Range to 50%.
  48. On the left, click Inner Glow.
  49. Change the color to #e4dede, the Source to Edge, Choke to 0%, Size to 7 px, and Contour to "Sawtooth 1".
  50. On the left, click Outer Glow.
  51. Change the Color to #4f94b1, Size to 75 px, and uncheck the Anti-aliased box.
  52. In the top right, click OK to commit the styles.
  53. In the bottom right Layers area, right click the Emeraldas text layer, then click Blending Options.
  54. Apply same Blending Options used on the Queen text layer to the Emeraldas text layer, using the custom preset to expedite the process.
  55. In the left toolbar right click the Object Rectangle Tool and select the Ellipse Tool.
  56. Draw a wide ellipse, with the left and right edges parallel with the red/orange border, the top edge touching the edge of the white border, and the bottom edge touching the top of the Q in Queen.
  57. Press T for the Type Tool and click on the edge of the ellipse and type Space Pirate.
  58. Hold Ctrl and drag the diamond node into the ellipse's interior to get the text from the outside to the inside, then click and drag the node around the ellipse to get the text at the bottom of the ellipse.
  59. In the small box, change the font to "Segoe Script", the size to 80 pt, and the color to #ffa200.
  60. Press V for the Move Tool and move the Space Pirate text layer up to give space between Space Pirate and Queen.
  61. In the bottom right Layers area, click the eye icon next to the ellipse thumbnail to hide the layer.
  62. In the bottom right Layers area, right click the Space Pirate text layer, then click Blending Options.
  63. On the left, click Inner Glow.
  64. Change the Color to #ffa200, the Source to Center, Choke to 20%, Size to 7 px, and Contour to "Linear".
  65. On the left, click Outer Glow.
  66. Change the Color to #4f94b1 and Size to 18 px.
  67. On the left, click Color Overlay.
  68. Change the Color to #ff0000 and Opacity to 10%.
  69. In the top right, click OK to commit the styles.
  70. Press T for the Type Tool and create a text box at the bottom of the canvas, with the edges aligned with the edges of the black rectangle.
  71. In the small box, change the font to "Agency FB" and size to 48 pt.
  72. Type the credits.
  73. While the blinking text cursor is in the credits text box, press Ctrl+A to select all text.
  74. In the rightmost Properties section, change the Set Leading to 48 pt, Tracking to -10, and Alignment to Center.
  75. Click and drag the Dolby image onto the canvas and adjust the size and position to fit below the credits text.
  76. In the top bar: Image > Adjustments > Invert (smart filter)
  77. Click and drag the PG-13 image onto the canvas and adjust the size and position to fit below the credits text.
  78. In the top bar: Image > Adjustments > Invert (smart filter)
  79. Click and drag the 20th Century Fox image onto the canvas and adjust the size and position to fit below the credits text.
  80. In the top bar: Image > Adjustments > Invert (smart filter)
  81. In the top bar: Image > Image Size
  82. Set the Resolution to 72 Pixels/Inch, and click OK.
  83. Shift+Ctrl+S to Save As a Photoshop file (.psd).
  84. In the top bar: File > Export > Export As
  85. Change the format to JPG. Click Export.

— Gallery —